Table of Contents
ToggleEvery Minecraft player hits that moment: your chest is empty, the hunger bar is flashing, and you’re tired of wandering the wilderness for food. Or maybe you’re knee-deep in a massive build and need stacks upon stacks of materials, fast. That’s where farm design comes in.
Building farms in Minecraft isn’t just about survival: it’s about transforming your world from reactive scavenging to proactive abundance. Whether you’re after steady food sources, automated resource generation, or late-game materials like prismarine and iron, the right farm design makes all the difference. This guide covers everything from basic crop layouts to complex mob grinders and specialized resource farms, with attention to both Java and Bedrock Edition quirks. Let’s dig in.
Key Takeaways
- Optimized minecraft farm design eliminates wasted movement, maximizes yield per block, and enables automated resource collection, transforming survival from reactive scavenging to proactive abundance.
- Core farm principles including accessibility, proper lighting (9+ light level), water efficiency (within 4 blocks of farmland), and chunk loading are essential for effective farm layouts across all farm types.
- Automatic farms using observers for pumpkins and melons, or villager-powered crop systems, deliver passive resource generation and are fundamental to late-game minecraft farm building.
- Specialized farms like iron golem farms (200+ ingots per hour), guardian farms (50+ XP levels per hour), and enderman farms (30+ levels per minute) provide critical late-game resources and XP.
- Java and Bedrock editions have significant mechanic differences in redstone, mob spawning, villager behavior, and trident killers—always verify farm designs match your version before building.
- Common mistakes like ignoring light levels, poor water placement, overlooking chunk boundaries, and building too close to your base can cripple farm efficiency, so test prototypes before scaling.
Understanding the Basics of Minecraft Farm Design
Why Farm Design Matters for Efficiency and Resource Management
Throw down some seeds and call it a farm? Sure, it’ll work. But efficiency separates casual players from those who’ve got their resource pipelines dialed in.
Farm design impacts collection speed, space usage, and how much time you’re stuck replanting. A well-designed farm minimizes wasted movement, maximizes yield per block, and, in automated setups, lets you walk away while resources pile up. Poor layouts mean you’re babysitting crops, chasing animals through poorly gated pens, or dealing with mobs that don’t spawn where you need them.
In survival mode, where time equals resources, an optimized farm design can be the difference between grinding for hours and having surplus materials to trade, build, or stockpile. Even in creative builds, thoughtful farm layouts enhance the aesthetic and functional integration of your base.
Key Principles of Effective Farm Layouts
A few core principles apply across nearly every minecraft farm design, whether you’re growing wheat or grinding Endermen.
Accessibility: You should reach every part of your farm without parkour. Build walkways, use slabs or trapdoors to prevent trampling crops, and position chests within easy reach.
Lighting: Crops need light level 9+ to grow: mobs spawn in darkness. Plan your lighting to support growth or spawn rates depending on the farm type. Torches, glowstone, and sea lanterns all work, but spacing matters.
Water Efficiency: Farmland must be within four blocks of water to stay hydrated. Compact designs hide water under slabs or trapdoors to maximize crop density without sacrificing growth speed.
Chunk Loading: Farms only work in loaded chunks. If you’re building far from your base, consider the simulation distance and whether you’ll use chunk loaders (Java) or stay nearby (Bedrock).
Scalability: Start small, but design with expansion in mind. Modular layouts let you duplicate sections without redesigning from scratch.
Essential Crop Farms for Survival and Beyond
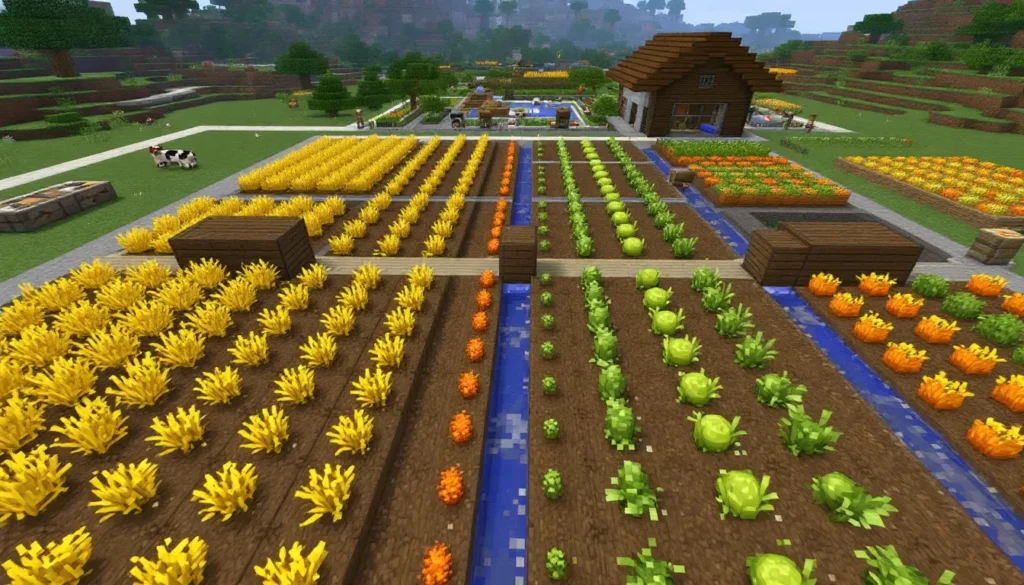
Wheat, Carrots, and Potato Farm Designs
These three crops form the backbone of early-game food production. They share the same growth mechanics, so one minecraft farm build works for all three.
Basic 9×9 Layout:
Dig a 9×9 square of dirt, place a water source in the center, and till the surrounding 80 blocks. This is the most space-efficient design for manual harvesting. Add a fence or wall around the perimeter to keep mobs out, and light it up with torches every few blocks.
Linear Trench Design:
For larger operations, dig trenches of water every 8 blocks, with 7-block-wide crop rows between them. This scales infinitely and is easy to harvest row-by-row. Hide water under lily pads or use trapdoors for a cleaner look.
Carrots and potatoes drop multiple items when harvested, making them slightly more efficient than wheat for food production. Wheat’s main advantage is breeding animals and crafting bread.
Pumpkin and Melon Farm Configurations
Pumpkins and melons grow differently, stems produce fruit on adjacent dirt or grass blocks, not farmland.
Alternating Row Design:
Plant stems in rows of tilled farmland with water channels every 8 blocks. Leave dirt or grass rows between stem rows for fruit to spawn. This gives each stem four potential spawn spaces. Harvest by breaking the fruit blocks: stems stay intact and regrow fruit automatically.
Checkerboard Pattern:
Alternate stems and empty dirt in a checkerboard for maximum density. Each stem has two adjacent spawn spaces, which is less efficient than rows but more compact for small builds.
For automation, observers detect when fruit appears and trigger pistons to break them. Hoppers or hopper minecarts collect the drops. This is a staple of efficient minecraft farm designs for resource generation.
Beetroot and Sweet Berry Farm Setups
Beetroots follow the same rules as wheat, carrots, and potatoes. They’re less popular due to lower food value, but they’re useful for red dye and breeding pigs in a pinch.
Sweet berries are unique. Plant them on grass or dirt, and they grow in stages without needing farmland or water. Right-click to harvest at stage 3 (full growth) to get 2-3 berries. Stage 2 yields 1-2 berries but slows regrowth.
Sweet Berry Fencing:
Plant sweet berries in rows with one-block gaps for walking paths. They damage players and mobs that walk through, so they double as a defensive barrier around your base. Pair them with pathways made of slabs or carpet to avoid taking damage while harvesting.
Advanced Automatic Crop Farm Designs
Observer-Based Automatic Farms
Observers revolutionized farm automation when they were added. They detect block updates, like a pumpkin or melon growing, and output a redstone pulse.
Observer-Piston Melon/Pumpkin Farm:
Place observers facing the dirt where fruit will spawn, with pistons behind them. When fruit appears, the observer triggers the piston to push and break it. Hoppers or hopper minecarts below collect the drops. This setup works for both Java and Bedrock, though timing can vary slightly.
For crops like wheat or carrots, villagers are the better automation route since observers can’t detect growth stages. But, some minecraft farm ideas involve using observers with other mechanics, like detecting when a composter fills or a hopper empties, to create more complex automation chains.
Villager-Powered Crop Farms
Villagers with the farmer profession will plant, harvest, and share crops automatically. This is one of the most versatile minecraft farm builds for passive resource generation.
Basic Villager Farm:
Build a 9×9 farmland area with a composter to assign a villager the farmer profession. Toss the villager 3 stacks of seeds, carrots, or potatoes. They’ll plant and harvest continuously. Place hoppers under the farmland (with solid blocks in between to prevent items from falling through) or use hopper minecarts on rails beneath to collect drops.
Villager Trading Halls with Farms:
Integrate crop farms directly into trading halls. Farmers will tend crops while you trade, creating a renewable source of emeralds. This setup is popular in late-game bases where efficiency and aesthetics intersect. Understanding crop growth mechanics helps optimize these layouts for maximum yield.
Bedrock players should note that villager behavior differs slightly from Java, farmers may be less reliable in some versions, so test your farm before scaling up.
Animal Farm Designs for Sustainable Food Production
Chicken, Cow, and Sheep Farm Layouts
Animal farms are straightforward but benefit from smart design to prevent escapes and streamline breeding.
Compact Breeding Pen:
Build a 5×5 fenced area with gates for entry. Keep at least two adults of each species inside. Breed them with wheat (cows and sheep) or seeds (chickens), then move babies to a separate pen to grow. This prevents overcrowding and makes it easier to manage breeding cooldowns.
Multi-Tier Chicken Farm:
Chickens lay eggs, which can be thrown to hatch more chickens. Build a vertical farm with hoppers collecting eggs from each layer. Dispensers auto-throw eggs, and lava blades or other kill mechanisms harvest adult chickens automatically. This is one of the most space-efficient minecraft farm designs for food and feathers.
Sheep Color Sorting:
Use water streams and fences to separate sheep by wool color. This is purely aesthetic but satisfying if you’re building themed farms. Shear with auto-dispensers (Java only) or manually for renewable wool.
Pig and Rabbit Breeding Farms
Pigs and rabbits follow similar breeding rules to other animals but have niche uses.
Pig Farm:
Breed pigs with carrots, potatoes, or beetroot. They’re efficient food sources since cooked porkchops restore 8 hunger points. Build a simple pen with gates and keep breeders separate from slaughter stock.
Rabbit Farm:
Rabbits breed with carrots, dandelions, or golden carrots. They drop rabbit hide (4 hides craft 1 leather), raw rabbit, and rabbit’s foot (useful for potions of Leaping). Build a fenced enclosure with overhead netting or a roof since rabbits can jump higher than most mobs. According to experts at Twinfinite, rabbit farms are underrated for early-game leather if you’re short on cows.
Mob Farms: Maximizing Drops and Experience
Basic Mob Spawner Farm Designs
Dungeon spawners (zombie, skeleton, spider, or cave spider) are the easiest entry into mob farming. They spawn mobs continuously in a 9x9x3 area around the spawner.
Spawner Farm Setup:
Clear a large room around the spawner (at least 9×9), then build a water flow system that pushes mobs into a drop chute. A 23-block fall reduces mobs to 1 HP, so you can one-shot them for loot and XP. Alternatively, use a 30+ block fall for automatic kills, though you’ll sacrifice XP.
Place hoppers and chests at the bottom to collect drops. Light up surrounding caves to maximize spawner efficiency, mobs won’t spawn if the mob cap is filled elsewhere. Players exploring advanced engineering concepts often incorporate complex redstone switches to toggle farms on and off.
Creeper, Skeleton, and Zombie Farms
General mob farms exploit natural spawning mechanics rather than spawners. They’re more complex but yield better rates.
Dark Room Mob Farm:
Build a large, dark platform (at least 20×20) high in the sky or deep underground to avoid natural terrain spawn competition. Mobs spawn on the platform, fall through trapdoors or are flushed by water into a kill chamber.
Mob Sorting:
Use the fact that skeletons and zombies burn in daylight while creepers don’t. Design your farm with sunlight exposure to separate them, or use cats to scare creepers into specific channels (Java only).
Trident Killers (Java):
Place a trident with Impaling in a dispenser on a fast clock. It’ll kill mobs automatically while you collect XP nearby. Bedrock doesn’t support this, so rely on fall damage or manual kills.
Enderman and Blaze Farm Strategies
Enderman Farm (The End):
Build a platform in the End with a 2-block-high ceiling so Endermen spawn but can’t teleport away. Use an Endermite in a minecart as bait to lure them to a central kill spot. This is one of the best XP farms in the game, rates can exceed 30 levels per minute.
For overworld Enderman farms, find a plains or desert biome and build a similar 2-high platform at Y=1 to increase spawn rates.
Blaze Farm (Nether Fortress):
Locate a blaze spawner in a Nether fortress. Build a kill chamber using a slab platform to control spawns. Blazes naturally fly, so use wither roses (Java) or manual attacks to kill them. Blaze rods are essential for brewing, making this farm critical for late-game potion production. Sites like GamesRadar+ frequently publish updated blaze farm schematics for each major version update.
Specialized Resource Farms for Late-Game Players
Iron Golem Farms for Unlimited Iron
Iron is the lifeblood of Minecraft automation, hoppers, rails, anvils, and tools all demand it. Iron golem farms generate it passively.
Village-Based Golem Farm:
Villagers spawn iron golems when they panic or gossip (mechanics vary by version). In Java, build a farm with 3 villagers, 3 beds, and a profession site. Golems spawn, are flushed by water into a lava blade or fall damage trap, and drop iron.
In Bedrock, golem spawning is less predictable. You’ll need at least 10 villagers and 21 beds, with careful attention to village boundaries. Rates are lower than Java, but still worthwhile.
A well-built iron farm can produce 200+ iron ingots per hour in Java, making it one of the most valuable minecraft farm ideas for endgame progression.
Slime Farm Designs and Chunk Finding
Slime is needed for sticky pistons, leads, and slime blocks (essential for flying machines and redstone contraptions).
Slime Chunk Farms:
Slimes spawn in specific “slime chunks” below Y=40. Use tools like Chunkbase (external website) or in-game methods (F3+G on Java to show chunk boundaries) to locate them. Dig out multiple layers within the chunk, light them up to prevent other mob spawns, and wait for slimes.
Swamp Slime Farms:
Slimes also spawn in swamps at light level 7 or lower during specific moon phases (full moon = highest rates). Build platforms in a swamp biome and use campfires or other area-denial methods to funnel slimes into a kill zone.
Slime farms are lower yield than iron or mob farms but essential for players heavily invested in redstone.
Guardian Farms for Prismarine and Experience
Guardian farms are among the most complex and rewarding minecraft farm builds. They require draining an ocean monument, which is no small feat.
Ocean Monument Preparation:
Use sponges (obtained from ocean monuments or elder guardians) to drain the monument interior. Then, build a spawn platform where guardians appear and flush them into a kill chamber using soul sand water elevators or nether portals (advanced Java technique).
Rates and Rewards:
A fully functional guardian farm produces prismarine (blocks and shards), cod, and massive XP, often 50+ levels per hour. They’re late-game projects but offer some of the best returns. Resources from Game8 often feature guardian farm schematics optimized for both versions, detailing the differences in guardian spawning mechanics.
Creative and Aesthetic Farm Design Ideas
Incorporating Farms into Your Base Design
Farms don’t have to be eyesores tucked underground. Integrating them into your base adds functionality and flair.
Rooftop Farms:
Build crop farms on your base’s roof. Use fences, hedges, or custom terrain to blend them into the architecture. This is especially effective in medieval or cottage-core builds.
Basement Automation:
Hide technical farms (iron golem, villager breeders, mob grinders) below your base. Use trapdoors, paintings, or hidden entrances to keep the aesthetic clean while reaping the benefits.
Greenhouse Designs:
Construct glass domes or walls around crop farms for a modern or futuristic look. Add interior lighting with sea lanterns or glowstone for both function and style.
Garden Pathways:
Surround farms with custom paths using grass paths, gravel, or stone bricks. Add decorative elements like flower pots, hay bales, or composters to make the area feel lived-in. Many players expanding their creative building skills often experiment with blending farms into larger architectural projects.
Medieval, Modern, and Fantasy Farm Themes
Medieval Farms:
Use oak fences, cobblestone paths, and thatch roofs (hay bales and trapdoors). Animal pens should look rustic with irregular shapes and natural terrain. Add wheat fields bordered by dirt paths and scatter bone meal for a “just harvested” vibe.
Modern Farms:
Clean lines, concrete, and glass define modern minecraft farm designs. Use white or light gray concrete for walls, iron bars for fencing, and sea lanterns for lighting. Incorporate water features with blue concrete or prismarine accents.
Fantasy Farms:
Go wild with custom trees (dark oak, azalea, or mangrove), glowing mushrooms, and unusual crops like sweet berries or nether wart. Use deepslate, blackstone, or end stone for paths. Add enchanted-feeling lighting with soul lanterns or shroomlights.
Optimizing Farm Performance in Different Minecraft Versions
Java Edition vs. Bedrock Edition Considerations
Java and Bedrock share the same game at a surface level, but farm mechanics differ in critical ways.
Redstone Behavior:
Java redstone is consistent and predictable. Quasi-connectivity (BUD powering) allows for compact designs. Bedrock redstone lacks quasi-connectivity, and timings differ, some Java farms won’t work on Bedrock without modification.
Mob Spawning:
Java uses a global mob cap (70 hostile mobs in single-player), while Bedrock’s cap is per-player and applies within a 128-block radius. This affects farm rates and designs. Bedrock mob farms often need to be built higher or farther from other spawn areas.
Villager Mechanics:
Java villagers share items, making automatic crop farms more reliable. Bedrock villagers are less cooperative, and some designs require manual intervention or different layouts.
Iron Golem Spawning:
Java iron farms are efficient and compact. Bedrock requires more villagers and beds, and rates are significantly lower, expect about 40% of Java rates in optimal conditions.
Trident Killers and Auto-Attacks:
Java allows tridents in dispensers and supports some auto-attack exploits. Bedrock doesn’t, so mob killing must rely on fall damage, lava, or manual hits.
Platform-Specific Resources:
If you’re playing Bedrock on console (Xbox, PlayStation, Switch), you won’t have access to external tools like Chunkbase mid-game unless you check on a second device. Java players can alt-tab freely.
When researching minecraft farm builds online, always verify which version the design is for. Cross-version compatibility isn’t guaranteed, especially for redstone-heavy or villager-based farms.
Common Farm Design Mistakes to Avoid
Even experienced players make these errors when designing farms.
Ignoring Light Levels:
Crops won’t grow in darkness: mobs won’t spawn in light. Double-check light levels with F3 (Java) or by observing mob behavior (Bedrock). A single misplaced torch can ruin a mob farm’s rates.
Poor Water Placement:
Farmland must be within 4 blocks of water, but too much water wastes space. Use hidden water blocks or compact trench designs to maximize crop density.
Forgetting Chunk Boundaries:
Slime farms only work in specific chunks. Iron golem farms can straddle chunk borders and break. Use F3+G (Java) to visualize chunks before building.
Overcrowding Animal Pens:
Too many animals in one space causes lag and can trigger entity cramming, killing them. Keep breeding pens small and separate growers from breeders.
Building Too Close to Your Base:
Mob farms need to be far enough from your base to avoid competition with natural spawns. If you’re getting poor rates, check if mobs are spawning in nearby caves or at your base.
Not Testing Before Scaling:
Build a small prototype to confirm mechanics work in your version (especially for cross-platform players). Scaling a broken design wastes hours and materials.
Ignoring Simulation Distance:
Farms stop working outside loaded chunks. In multiplayer, simulation distance is server-set. In single-player, you can adjust it, but performance may suffer. Don’t build farms in remote locations unless you understand chunk loading.
Using Outdated Designs:
Mechanics change with updates. A farm tutorial from 2019 may not work in 2026. Always check the version number and patch notes, especially after major updates like the Caves & Cliffs or Trails & Tales releases.
Conclusion
Building effective farms in Minecraft transforms your gameplay from reactive survival to self-sustaining mastery. Whether you’re laying out a simple 9×9 wheat plot, automating a villager crop system, or constructing a guardian farm for endless XP and prismarine, the principles remain the same: plan for efficiency, understand your version’s mechanics, and scale thoughtfully.
The minecraft farm designs you choose depend on your goals, early-game food security, mid-game automation, or late-game resource generation. But the real magic happens when you blend function with form, creating farms that aren’t just productive but integral to your world’s identity. Start small, test your layouts, and expand as your needs grow. With the right design, your farms will keep you supplied for every build, battle, and adventure ahead.